Purpose
This guide will teach you how to setup a Google map with auto updating Spotter Network position on your web site. You can view an example here on my site.
Pre-requisites
You’ll need a Google account for the Google Maps API Key. A website will also be a pre-requisite, with either a Linux host or another type of host that you can schedule a task to download your position from SN.
Setting up Google Maps API
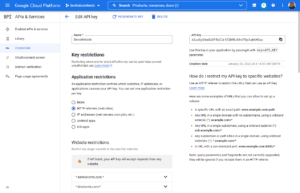
You will need a Google Maps API key which is unique to your account. This is how they charge you if you get 10s of thousands of hits and actually cost them money, I guess. You’ll want to head on over to the Google Maps Platform page.
I have included a screen shot from my Google Cloud Platform console below. I setup a restriction based upon HTTP referrers, and entered in my website domains.

SpotterNetwork XML file
The next step is to setup the mechanism to make your Spotter Network position available. To do this, we will setup a cron tab to download your Spotter Network position and put it in a publicly available space. This is easiest done if you have SSH access, however, most web hosts do not allow this. If you have a control panel, there will likely be a mechanism to setup a cronjob or scheduled task in the control panel.
You’ll need to know the path to your web root. This is the path to the directory your web site resides, or where you’d upload files to.
Crontab to Download XML file
On Linux, we’ll edit crontab with a crontab -e command. You’ll need the private URL to your SpotterNetwork XML file. You can get that by going here. You’ll see that the format is already included on the SN site for crontab, however, I made an adjustment on mine. Crontab lets you edit how often the command runs – in this case, a wget command that downloads an XML file. The default in the SN example is all asterisks, or once every minute. I don’t need that precise updates, so I changed mine to every 3 minutes.
*/3 * * * * /usr/bin/wget -q -O - http://www.spotternetwork.org/pro/feed/[YOUR PRIVATE ID]/gm.php > /var/www/html/location.xmlCreating Map
Once you have verified the XML file is downloading and updating to a web accessible location, you are ready to create the map. This is pretty simple, using the code from my location page.
In the <head> section of your website (also called header), add this code to call jquery. Jquery is needed for the auto-update feature of the map.
<script src="https://ajax.googleapis.com/ajax/libs/jquery/3.5.1/jquery.min.js"></script> The rest of the code you need is below. Add this on your web page where you want to place your map. You can use CSS to resize the container for the map.
You will need to change the following:
- url: “//www.example.com/path/to/location.xml” (Put the URL to your location file from above)
- var marker_image = ‘//www.example.com/path/to/location-icon.png‘ (Put the URL of your marker image)
- <script src=”https://maps.googleapis.com/maps/api/js?key=GOOGLE MAPS API KEY&callback=initMap” async defer></script> (Insert your Google Maps API Key)
<div id="map" style="height: 95%"></div>
<div id="update"></div>
<script>
	var map;
	var markers = [];
	function initMap() {
		map = new google.maps.Map(document.getElementById('map'), {
			center: {lat: 35, lng: -97},
			zoom: 10
		});
		loadMarker();
		refresh();
	}

	function refresh() {
		setInterval(function () {
			loadMarker();
		}, 60000);
	};


	function deleteMarker() {
		for (var i = 0; i < markers.length; i++) {
			markers[i].setMap(null);
		}
	}

	function convertUTCDateToLocalDate(date) {
    var newDate = new Date(date.getTime()+date.getTimezoneOffset()*60*1000);

    var offset = date.getTimezoneOffset() / 60;
    var hours = date.getHours();

    newDate.setHours(hours - offset);

    return newDate;
    }

	function loadMarker() {
		var page = new Date().getTime();
		$.ajax({
			url: "//www.example.com/path/to/location.xml",
			dataType: 'xml',
			data: {page: page},
			success: function(data) {
				deleteMarker();
				ben = data.documentElement.getElementsByTagName("spotter");
				for (var i = 0; i < ben.length; i++) {
					var name = ben[i].getAttribute("callsign");
					var marker_image = '//www.example.com/path/to/location-icon.png';
					var time = ben[i].getAttribute("report_at");
					var localtime = convertUTCDateToLocalDate(new Date(time));
					mylat = parseFloat(ben[i].getAttribute("lat"));
					mylng = parseFloat(ben[i].getAttribute("lng"));
					map.setCenter(new google.maps.LatLng(mylat,mylng));

					var image = {
						url: marker_image,
						size: new google.maps.Size(26, 26),
						origin: new google.maps.Point(0, 0),
						scaledSize: new google.maps.Size(26, 26)
					};

					var point = new google.maps.LatLng(
						parseFloat(ben[i].getAttribute("lat")),
						parseFloat(ben[i].getAttribute("lng")));
						var marker = new google.maps.Marker({
							map: map,
							position: point,
							icon: image,
							title: time
						});
					markers.push(marker);

					document.getElementById('update').innerHTML = "Last Updated: " + localtime + " (" + time + " UTC)";
				}

			}
		});
	}

</script>
<script src="https://maps.googleapis.com/maps/api/js?key=<GOOGLE MAPS API KEY>&callback=initMap" async defer></script>
Adjustments
You can change the zoom level and more by changing some of the variables in the code. This is all covered in detail in the Google Maps Javascript API Documentation.


